Make your own table centre piece
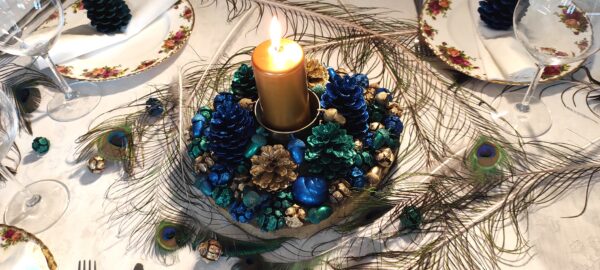
I never thought I would need a table centre piece, but whenever I go out for a walk around our woods or field, I come back home with my pockets full of treasures. Sometimes, it is an empty snail shell, a porcupine quill, a pine cone, or anything that looks beautiful to me. A couple of weeks ago, I did not even have to go for a walk. There had been a storm with very high winds one night, and when I went out to see my chickens in the morning, I found a vast amount of old cypress fruits (galbulus) on the ground. I needed to remove them quick, as they posed a risk for me or the kids slipping on them as our chicken run is on a slope. When I finished, I had a bucketful with some pine cones too.
I love taking nature inside our home, and to me this was a treasure bounty that was screaming to be used in some crafts, so I decided to use them and make a table centrepiece in time for Christmas. My very first one. In my opinion, they look absolutely beautiful just the way they are. I love nature colours and I don’t think they need any improvement. Still, I am also a bit of a magpie when it comes to things I collect, so for this centrepiece, I wanted it to be more eye-catching. I also wanted to get my youngest son involved, so I decided to spray paint them with my favourite colours. Peacock colours! And this is the result. I think it turned out pretty good, and it has been sitting on our table ever since I finished it, as I don’t think it is necessarily Christmassy.

It is very easy to make, so if you would like to make one, you can find all the instructions below.
Materials needed:
- Pine cones, snail shells, acorns, cypress galbulus, or anything you find that catches your eye.
- Spray paints if using (you can also keep it natural). I used metallic spray paints
- If you are using spray paints, you will also need some plastic gloves and something to protect the surface where you will be spraying.
- hot glue gun
- tray or wood slice or a piece of cardboard/cake stand
- candle holder/glass/candle sticks (anything to burn the candle safely and avoid it touching any of the decorations)
- candle

Steps
- First, inspect all your findings and make sure they are free of dust/soil. In case they are a bit dirty, just give them a brush.
- If using spray paints, you will need something to protect the floor/table where you intend to spray. Ideally, do this in a place with some ventilation so you do not inhale the fumes. My son and I set up a spot in the garden with cardboard to protect both the grass and to keep the pine cones and the rest clean.


- Paint all your findings. You will need to do this in a couple of sessions as you will not be able to cover all sides in one go. I have also painted the candle glass and the slice of wood, as I wanted them all to blend in.
- When it is all dry, you can start assembling it. I would suggest having a few tries to see which arrangement you like best. I tried a few ways, first with the pine cones at the edge of the wood slice, but in the end, I preferred them to be closer to the candle holder. Below are pictures of my first few attempts, including some with different colours.


- Once ready, start sticking everything in place with the hot glue gun.
And that it is it. You have a beautiful new centre piece and a bit of nature in your home.
I hope you enjoyed it.
If you make this and are on Instagram, please tag me. I would love to see what you have created.
-
-
2 months
Tagged bedroom, diy, feature wall, home decor, mandala