Build a pond in your garden
Since moving to this house, we have been itching to start decorating it and making it our own. We’ve got plenty of ideas on how we want it, but here in Italy, at the moment, it is impossible to find an electrician willing to rewire our whole house. So, we are stuck, and while we are waiting for a good soul to help us, we have started with the outside.
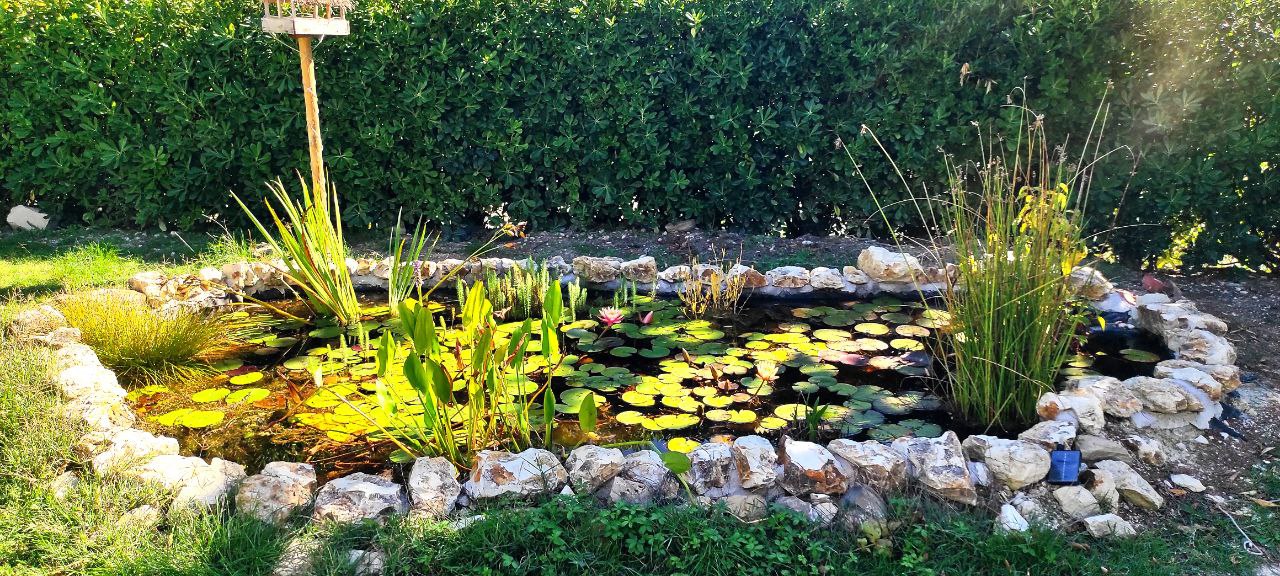
One of our first jobs was to create a pond. We’ve always had one in our previous homes (albeit very small). It’s something I particularly love, as I could spend hours watching the busy little critters that very quickly populate it.
This was our first time building a pond from scratch ourselves (although I had tried it with half a wine barrel before), so after reading all the material I could find, we went ahead.
We did not go for a huge pond; it is around 12 m2. In the future, we may even want to dig a natural swimming pool, but that will be in a long time. There are plenty of other things to do before we get there.
Anyway, let’s start and get down to business!
It may sound ridiculous, but the first step is to choose the right location. There are many factors to take into consideration. Of course, it will also depend on how much space you have. You should consider sun exposure as too much shade might not suit certain water plants. Under trees might be a problem in autumn when all the leaves fall onto the water and will require your time to scoop them out. You do want it in a place where you can enjoy it but at the same time not be in the way and a hazard to people and animals. We settled for a corner in our front garden that was a bit of a “dead space”. Visible from home, easily accessible, not in the way of anything. The only downside is that it is a little sheltered and close to a centenarian Mulberry tree, so I will need to work a little bit more clearing up the leaves in autumn, but it is due a prune this year, so it will be OK for a while after that.

The next step is to design or have an idea of what your pond should look like. We used a rope to mark a simple design on the ground and then stepped back to see if it fitted with the whole look of the garden. When we stepped back, we realised it looked too small and really out of place, so we kept adjusting it, especially in size. Eventually, we found the perfect size, and the process was a lot of fun!

After this, it is digging time! Having researched the subject for a while, I realised that, as a general rule, we needed at least two levels of depth. The first one, all around the perimeter at 30cm, where we would put all the marsh plants, whilst the centre of the pond needed to be deeper at 60cm, where we could plant the water lilies as they require more water above to flourish. I am not going to lie; the digging part was not fun! Even though we got everyone in the family involved, it was still hard work. The boys had great fun for a few days, then decided it was boring, so it was all left to Paul. And he did a great job!
We also made a little “ramp” on one side of the pond to give easy access to water to all the little critters and animals that want a drink now and then, and my chickens, bees, cats and many other insects seem to love it. Paul saw a deer drinking from it, and we even found a couple of snake molts close by.
When all the digging had been done, my hubby realised that the ground was not even and that one side of the pond was lower than the other, so he built it up a little with a few bricks to ensure it would be level all around. We then covered the whole area with a thin underlayment fabric and, on top, a PVC liner, making sure we left some 10 inches or more sticking out all around, which would be trimmed later. We used the underlayment to protect the PVC liner from roots and sharp stones. Some people use a layer of sand instead, but we did have quite a lot of roots poking out that could have pierced through the PVC liner, so we thought it would be a safer bet. Make sure you don’t trim it just yet. Put some heavy stones or objects to keep it in place.
Once you have both liners ready, it is time to fill the pond with water. The weight of the water will make the liners completely adhere to the ground and to the shape you have dug, dispersing any air that might have gotten trapped underneath. This is why you should only trim excess liner after filling up with water, as you may end up short!

the underlayment 
my boys having a swim in the unfinished pond 
the rocks positioned in their place before trimming the PVC
Now, depending on your overall design, you can place rocks, boulders, gravel, or anything to keep the liners in place and achieve the look you want, decorating it accordingly. Once you are happy with it, you can trim and hide the excess liners. We gathered some big rocks from the fields around our home, as we really wanted to incorporate something from our surroundings, but I am still deciding on the finishing touches.
The last step is the most important if you want to be able to have clear water without the need for a filter. You need to carefully choose the plants that will go in the pond. In fact, you could start your research even before you begin the whole process or get someone to help you. There has to be a good balance between submerged (oxygenating), floating and emergent plants. A good pond shop will be able to suggest plants you need to reach and maintain clear water. After all, it is their job to know and sell their plants. Given the size of your pond, they should be able to work it out for you. We have used a fabulous online shop in Italy (https://www.pianteacquatiche.org/), which – after giving them some info about the pond, such as size, depth and sun exposure – have been able to give me the right plants with great results, as you can see from the pictures. Of course, now, it is up to us to keep an eye on and look after it. We have even added some fish. Very tiny asian ricefield fish called medaka that generally can thrive without adding any food, feeding on mosquito larvae (yaaaaay!!!) and other little critters they find in the pond. We have had them for over a year now, and they have multiplied and seem very happy, and I have never had to feed them.
- Choose the right location
- Outline the design on the ground
- Dig out the pond on two levels: one 30cm shelf around the pond for marsh plants and 60cm deep in the middle (or wherever your design calls for it) if you want to plant anything that requires that depth.
- Remember to add a small entry/escape route for amphibians and other small animals that may want to drink from your pond.
- You should also add an overflow so the water will remain level during heavy rain, and in case you have fish, they won’t get washed out.
- Check that the ground is level all around. You don’t want to find later that the water runs out on one side and doesn’t reach the top on the other, and make any necessary adjustments.
- line the pond with felt fabric (or a layer of sand) and the PVC liner, leaving a good extra 10 inches out to allow for any air gaps.
- fill it up with water.
- trim excess liner
- decorate
- add plants
- enjoy!


-
-
1 month
Tagged bedroom, diy, feature wall, home decor, mandala