How to build a bird table
When we lived in London, I loved leaving bird food out and watching the little birds while they were eating, and even if it was for a few fleeting moments, seeing them always cheered me up. Where we live now, there really is no need to leave food out for birds, as they definitely have enough to go around. Still, I really missed having a spot in the garden dedicated to them, where I could watch them, so I thought we could do with a table bird feeder near the pond. We don’t have a tree near the pond where we could hang it, so I thought of making my own one with a pole that we could dig into the ground, keeping it at a height safe from predators (we have five cats!) and from my chickens who would otherwise demolish the entire feed in a couple of minutes.
I decided to use a pallet (that’s all I ever have in the garage). And make a simple design with a tray and a roof to protect the food from the rain. I have made it into a stand bird table, but you don’t have to, and by just adding some rope, you can make it into a hanging one.
Materials needed:
- Wood from a pallet or any other suitable flat pieces of wood
- Thick plastic sheeting (I used the bag of chicken feed)
- Bundles of straw, tied together with either wire or twine.
- Post or some rope for hanging
- Nails
- Hammer
- Staple gun
- Jigsaw
- Sander (optional)
- Measuring tools
Instructions:
My measurements are only an indication as it will depend on how big you want yours to be and the pieces of wood you have at hand, so just take them as a guide only.
First, cut the pieces of wood/pallet slats to make the base. I cut three slats and decided to make the base square, so I measured how wide they were side by side (29cm) and cut them accordingly. Once you have settled on your measurements, go ahead and, using the jigsaw, cut them straight.
Cut two more pieces of the same length of the slats side by side (in my case, it was 29cm) so that you can nail and secure them all in place. You can cut these thinner, like I did, or leave them whole. See picture below.

Once you have the base nice and sturdy, you can think about the sides of the tray. I cut some more pallet slats to obtain 4 x 30cm sides – 1 cm longer than the tray so that it would overlap one side and I could nail the pieces together in place – The 1cm was the thickness of my pallet slats, so make sure you measure the thickness of your pallet so that it will not be too small or too big. You want them to fit snugly around the base. See pictures below.
As you can see, my tray was not perfectly straight, but still turned out fine. I also nailed them so they would be at level with the underside of the base to hide the slats underneath.
To make the roof, I split some pallet slats lengthwise using an axe, smoothed the edges and sanded them down so that they were not too rough on my hands and also to ensure I wouldn’t get splinters. These were not straight, as when you split them they just follow the grain of the wood, but I think it adds to the natural look. I made them into 9 “sticks” in three different lengths. 2 x 27cm tall to be the middle of the roof and 4 shorter at 13cm to be at the bottom of the roof slope. The length of the 3 middle sticks was 27cm, so nailed together with the sides, I would be able to fit them inside the tray. Again, this depends on the thickness of the wood you are using. You can see the little video here below. Even though I didn’t film it, I did end up using two nails everywhere to make it more stable. I made two more of those “U” shaped frames, shorter, to go either side of the central ones and nailed them to the sides of the tray.
At that point, I used some plastic sheeting and stapled them in place on the “U” frames.
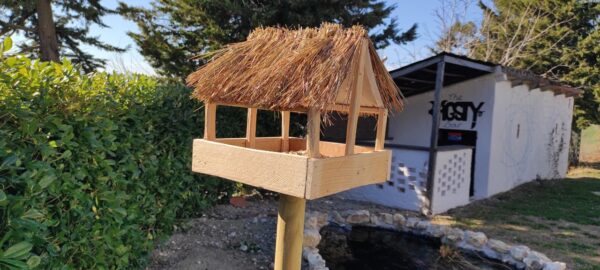
To make the bird table look like a hut, I bundled together dry, long grass that I had for my chickens with some wire, but straw would be perfect, too. These little bundles were then stapled across the whole roof.
Now you can either put some rope and hang it on a tree branch, set it on a table or put it on a stand like I did and enjoy birdwatching!

-
-
7 hours
Tagged bedroom, diy, feature wall, home decor, mandala